Scratch Testing


Introduction
Quantification of very thin film adhesion properties is crucial to many applications in both industrial and academic worlds. In recent years, with the coating thickness dwindling down to the micron or even nanometer level, conventional pull-off tests can no longer satisfy the high accuracy and data consistency required at such a small scale. As a result, scratch technique has emerged as a successful alternative method to quantify the adhesion properties of thin film and coating structures. Beyond that, scratch testing offers several key advantages that no other measurements can match. It can be used to evaluate the coating scratch resistance, various coating failure mechanisms, and scratch recovery degree over time! Moreover, for products like hard drives, CDs, cell phones, and touch screens, scratch mechanism is actually more close to the reality than peel-off mechanism when the coating is failed from device surface, thus scratch technique is much preferred by researchers and engineers in those fields.
Scratch mechanism can be found everywhere in our daily lives. One might notice the tiny scratch marks behind the car door handle caused by finger nails. If one put key chains and a cell phone in one pocket and go out for jogging, it might end up adding a few new scratches on the smooth cell phone surface. Scratch happens when a sharp and hard object is used to rub against the other softer and flatter surface. The higher load applied and/or the softer surface is, the bigger/deeper scratch track is made.
Modern scratch technique can probably trace its origin back to the famous Mohs Scale which the German geologist and mineralogist Friedrich Mohs first used to help him study the hardness of different minerals. Mohs used mineral A to scratch against mineral B. If it left a visible scratch mark, he gave A a higher hardness index than B. Diamond has the highest index of 10 in Mohs Scale while Talc (main substance of baby powder) has 1. The ASTM G171 of materials scratch hardness determination can be seen as a highly sophisticated and accurate modern Mohs scratch test.
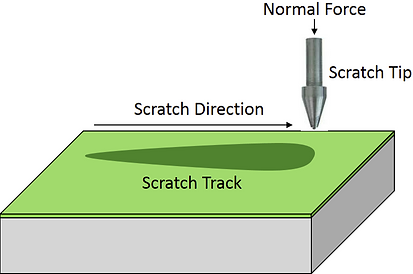
When scratching on a coating or film, we would like to see when the coating can be "scraped-off" from the substrate so the adhesion strength is evaluated at the critical failure point. To ensure the scratch track is visible on most of the materials, the scratch tip is usually made of diamond. The tip is typically in cone-shape with a spherical end to minimize stress concentration caused by tip geometry. One of the biggest advantages of scratch is to monitor the evolution of coating failure through a progressive load test (normal load keeps increasing while the scratch tip moves forward).

Not all coatings directly go into delamination failure under scratch. On the contrary, most of thin films experience a gradual failing process towards final delamination, which involves different stages (and mechanisms) of coatings failure. For instance, the diamond-like-carbon (DLC) thin film will first show micro-cracking at low loads of scratch, then part of the film will be chipped-off as the scratch load keeps increasing, and eventually reaches complete coating failure or delamination. Sometimes, the moment of first cracking or chipping is far more valuable than final delamination to certain researchers, which makes scratch technique a must-have for those research projects.
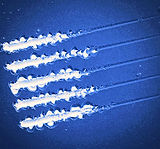
The output of scratch testing is usually pretty straightforward. Taking the following coatings A and B as an example, they are two candidates of the protective surface for the same substrate material, and they have rather close mechanical strengths. By performing the same progressive load scratch tests on both specimens, sample A fails much earlier than Sample B, which leads to a conclusion that coating A has a weaker adhesion or scratch resistance than B. Thus B is a better candidate for the new product. Of course, some of the scratch studies are more complicated, which require a comprehensive analysis over different aspects such as failure mechanism, coating recovery, and plastic to elastic deformation ratio. If you are interested in knowing more about our scratch testing services, please contact us!
(B)

(A)
Micro vs Nano Scratch
Coating Materials
Hard materials
(hard ceramics and high strength alloys etc.)
Intermediate, and soft materials (metals, plastics, polymers, etc.)
Microscratch
Nanoscratch
Load Applied
mN to N
(up to 30N)
uN to mN
(Min. 10 µN)
Sample Thickness
µm to mm
A few nm to a
few µm
Scratch Tip Radius
25 µm to 100 µm
1 µm to 25 µm
Lateral Force Measurement
Yes
Yes
Surface & Residual Depth Profiling
Yes
Yes
High Temperature Scratch
Nowadays, many coatings work at the conditions of elevated temperature. For instance, the protective coatings used on cutting tools not only have to be strong in mechanical strength, but also need to survive the localized high temperature caused by energy burst from strong friction/wear between the cutting edge and sample surface. Other products like automotive engines, computers, contact lens, and implants in the human body all require coating materials that can maintain its performance regardless of temperature change. The evaluation of the coating adhesion, scratch resistance, and recovery ability is an essential research subject. With the help of a heating stage as well as the scratch tip heating element, the specimen can be tested with nano or micro scratch up to 500 °C in our lab.


Advantages
Scratch technique can be employed to test a large variety of films and coatings, spanning from a few nanometers diamond-like carbon film to 50 microns soft polymer protective coatings. Compared to the pull-off test, the nano scratch technique provides a more comprehensive picture of different film failure mechanisms including cracking, chipping, buckling, spallation, plastic deformation, and coating delamination. Other information such as scratch residual depth determination is extremely useful for the study of coating elastic/viscoelastic recovery. Scratch technique can also be used to determine the hardness values of materials. Sometimes the scratch hardness is even more valuable than nanoindentation hardness, especially for extreme thin films (a few nanometers). The conventional pull-off tests are usually suffered from operation errors which cause inconsistency in data measurements. The scratch technique employs high resolution sensors and actuators to eliminate such error and provide unparalleled result consistency as well as excellent data storage capability.
Measurements
1. Coating failure modes
2. Film adhesion strength
3. Scratch resistance
4. Scratch hardness
5. Plastic deform degree
6. Elastic to plastic work ratio
7. Scratch recovery
8. Visco-elasticity
Standards
-
ASTM C1624 Standard Test Method for Adhesion Strength and Mechanical Failure Modes of Ceramic Coatings by Quantitative Single Point Scratch Testing
-
ASTM D7027 Standard Test Method for Evaluation of Scratch Resistance of Polymeric Coatings and Plastics Using an Instrumented Scratch Machine
-
ASTM D7187 Standard Test Method for Measuring Mechanistic Aspects of Scratch/Mar Behavior of Paint Coatings by Nanoscratching
-
ASTM G171 Standard Test Method for Scratch Hardness of Materials Using a Diamond Stylus
